Pages

Showing posts with label the film and darkroom users forum. Show all posts

Saturday 3 January 2015

FADU 2014

The year book is out.

Hopefully this is the start of a new era of year books from the film anddarkroom users forum (FADU). Earlier in the year Ian a member of FADU expressed his desire to have the year book started again and enquired if any of the other members would be interested in taking part. To his surprise there was a ground swell of enthusiasm for it to be reinstated. A boost to its reincarnation was Les Mclean's offer to curate and edit the book on behalf of the members.

This is the first book since Dave Miller the forums owner bowed out of producing the book back in 2012. There have been a number of calls by different members to get it going again but were not able to find anyone who had the time to get it off the ground. One of the main differences is that a number of members have gotten together to form a group to over see the submission process for the year book.

What makes this year book different from others, and the forum for that matter, is it's strict adherence to all pictures being scanned from photographs. Likewise for a picture to be included in the book, each associate was allowed to submit up to four photographs no larger than 8 x 10 in size. To be mailed to the submissions member no later than the end of October. They were then sent on altogether to Les Mclean for editing.

Another good thing about the submission process for the book was any member no matter what his or her level of experience, was invited to take part. I have to add that FADU is a very friendly welcoming forum who's members are always very willing to share their knowledge no matter who or where you are in your analogue journey.
So to the 2014 edition of the year book, i have to say there is a wonderful selection of photographs reproduced in the book. In the end, nineteen FADU supporters provided work for inclusion in the book. Not as diverse as previous years editions but a good number to start things going again. Of the seventy six photograph’s entered forty have been chosen. Representing all genre of photography.


Thanks goes to all the members who helped to make it a reality and a special thanks to Les McLean for taking on the editorial role. I think his involvement gave the project the impetus it needed to make it a reality. 


Thursday 15 December 2011

Rodinal or Pyro which will I use.


I was first introduced to Pyro by Trevor Crone when he mentioned it in a post on the film and darkroom users forum a year or so ago. I purchased a packet of the developer shortly after from my favorite supplier Silverprint. It has sat on the shelf gathering dust waiting for a suitable project.
The worst weather in over a hundred years postponed my trip into London to stock up, leaving me without any of my default developer Ilford ID11. The deluge of snow had revived a project started in the last snows at the beginning of 2010. I was starting to build up a back log of exposed film. I like to develop used film straight away. I had two developers on the shelf that could produce enough developer for the job, Rodinal or Pyro, I plumped for Mister Hutchens PMK pyro partly because it was a staining developer and it may bring something extra to my pictures of the snow.

Related post:

First use of PMK Pyro.

What next for PMK Pyro.

Agfa APX sorting out the test strips

Agfa APX test results

PMK Pyro working Solution

Solution B PMK Pyro

PMK Pyro afterbath


Thursday 8 December 2011

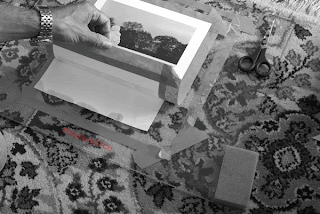
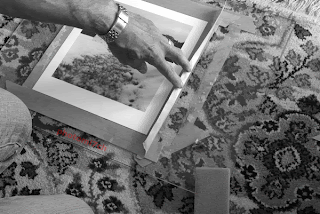
How to keep Fiber base photographs flat


This must be one of the most frustrating things about fiber base paper. It comes out of the wash tank like a limp rag and when it is drying it curls up like corrugated plastic but there is no getting away from the fact that photographs on fiber base paper have that something extra and it is worth the trouble in making sure they are flat.

Over the years I have used the cartridge paper and heavy books route to keeping my prints flat. I could use a special machine that dry's the prints using heat but I prefer the slower air dried method.

It wasn't until Dave Miller the founder of the film and darkroom users forum posted an article on his method for ensuring they dry flat, that life with FB paper has become so much easier. A big thank you to Dave for that article, without it I would still be using heavy books and would not be writing this post with my own refinement to his excellent method. My adaptation allows you to print right up to the edge with out trimming.

Equipment needed:

  1. Stick gummed tape to back of print
    A pane of glass large enough to cope with your largest print size.
  2. Adhesive brown paper tap that is made sticky by water. Available from most art suppliers.
  3. Craft knife.
  4. Scissors.
  5. Metal rule/ straight edge.
  6. Cartridge/ blotting paper.
  7. Sponge.
  8. Print squeege or leather.

My adaptation:

First of all you will need to remove any excess water from the print by hanging it for a short while and/or use a leather to dab it away.

  • Place pint on blotting paper before sticking to glass
    Cut a piece of cartridge/blotting paper slightly smaller than the print size.
  • Place on the glass.
  • Then place the photograph picture side down on the blotting paper.
  • Cut to length a strip of gummed brown adhesive tap.
  • Pull the tape tight and stick half the width on to the back of the print and smooth out. Remember that the print will still be damp so the tape will not need to be wetted.
  • Do the same for the other three sides. Once done turn the print over so it is picture side up.
  • sticking third strip of tape to glass
    Again cut a length of tape this time dampen it do not make it wet as it will not stick on contact but slide and fail to stick.
  • Pull the tape tight and stick to the tape at the top of the print half on and half off.
  • Wipe the damp sponge across the glass (again do not make wet as the tape will slide across the glass) and stick down.
  • Lift the print and place the blotting paper under the print and smooth down.
  • Next cut another length of tape for the bottom and do as before but once the tape is stuck to the tape and the glass is damp pull the print tight and stick down. This slight tension will keep the print flat.
  • Do the same for the sides.
  • Leaving to dry over night
    Leave to dry overnight.
  • To remove the prints once they are dry place a metal rule/straight edge along the side of the print and cut along all the sides with a craft knife. This will release the print perfectly flat.

Notes:


Used craft knife to free picture from glass
When moistening the tape to stick to the backing tape you only need to make it damp enough for it to contact stick - it is important that the whole length has been dampened. Then press it down firmly to the back of the print along its lengths and do the same when sticking tape to tape, otherwise it will allow the print to curl as it dry's, leaving a wavy edge. You can re-wet the print and lay it up again but it is better to get it right first time if you can.


To remove the tape from the glass it can be re-wetted and scraped off or place the glass in a dish of water to soak for about five to ten minutes.It will lift off with ease.

Tuesday 6 December 2011

The story behind the Winter Picnic Photograph.


It was round about this time last year (November/December 2010) that the UK was in the grip of the worst cold spell for as it turns out a hundred years. The country may have just missed coming to a standstill but it stopped me in my tracks literally, as I couldn't get the truck off the drive. The ice was a solid two inches thick not allowing for any grip!

The snow brought a brand new look to the area that I had not seen before, so I thought I would go out and take some photographs of this fresh, clean new wonderland of soft edges. Armed with my Bronica SQAi 120 format camera loaded with FP4 film I trudged gingerly off into the countryside.

Picnic
I was quite surprised to find there we a lot of people out and about with the same idea, walking the dog, playing and enjoying their enforced day off work. As I strolled further afield the numbers thinned until I was alone enjoying the crisp white land the snow had laid out for me to photograph; so engrossed with the scenes before me I forgot how bitterly cold it was until my throbbing freezing fingers sent SOS messages to my brain and brought me back to reality -“Shhahhhoi!!! Its cold.!” Pulling my gloves on the best I could I made off in a hurry to warm up.

Briskly walking up a path by one of the lakes the path turns a corner at the top where there is a bench and from a distance it looks like someone is sitting there! As I got closer I could see it was two people! -”they must be mad!- and it looks like they are having a picnic!” As I got closer I could see steam from their cups as they ate their mince pies! An idea for this picture was forming as I approach them to ask if they would mind being in the photograph. They did not mind, so I walked back down the track a bit, set up the camera on the mono pod, took a light reading and pressed the shutter. You're right! I only used one frame, no back up or bracketing, the view that came to mind is the one I took. After the shot was taken I walked back and chatted for a while. Apparently they don't let a little bad weather get in the way of them coming to their favourite spot! I wish them the best of the season and moved on. Not so mad after all! I wish I had thought to bring a hot drink with me!

I am pleased to say that Picnic was one of the Pictures chosen for this years Film and darkroom users Year Book. Which can be obtained from Blurb.

FADU year books