Pages

Showing posts with label 120 format. Show all posts

Saturday 29 April 2023

Street Photography part 3


It was a wise decision to use the look down viewfinder. It has aloud me
to make some extreme angle and candid images without to much fuss. If
someone catches my eye after making an image of them I always offer a card
so they can get in touch if they would like a copy of the image.

You get some looks when people suddenly realized that you may have included
them in a picture and or have a camera in your hand. You become a demon
that needs a scowl to keep you at bay so they can carry on their way with
there soul intact . I'm pleased to say there are others only to happy to chat.
But here is the rub I do not always print my images to include all the detail and
therefore they may only be a shadow.


I have found that the longevety of a project can be dependent on the kit you
use. Which bring me onto the camera system this can help or hinder the
possiblities in some cases. I know some people think I'm cracked to be lugging
a round a Bronica SQAi and that it is film based. You have to remember that it
is a pro set up meaning by changing the viewfinder I have a new angle of view
and therefore a different composition with the same lens, film combination. By
doing this it keeps the possibilities fresh. Likewise a change of lens would do
the same along with a change of film format from 120 to say 35mm.


The Bronicas look down viewfinder shows the picture back to front where left is
right, right is left. This can change the look of the compostion making it or
bracking it. It can also be frustrating when it comes to deal with a fast moving
street scene. This is where familatery with the way the camera works comes
into play.


 There are no rules to street photograph you do not have to use the same kit all
the time as hinted at above it is good to mix it up by doing so it keeps it fresh.
Oh! And Keep an open mind.


 Time moves on and so do I with camera in hand scouting for the next picture.


Techinal Data:

Monochrome images scanned from prints using flat bed scanner.  Ilford multigrade RC paper.

Pictures and article are the copyright of Mitch Fusco 2023.

Here are links to Preivious posts  on Street photography project if you have missed them.

Street part 2 

Street part 1 


Friday 18 November 2022

Picture post, Personaly processed slide film.

 Developed using the Fuji Hunt chrome 6 kit.


These were scanned using a flat bed scanner.

All the slide film used is Fuji Provia, RMS 120

Cameras used Bronica SQAi 6x6 negatives, Zero Pinhole multi format 6x9, Praktica MTL3.


All images are the copyright of Mitch Fusco 2022

E6 processing? youve got to be cracked!

fuji chrome ra
Processed using Fuji Hunt chrome 6


Who's idea was it to process E6 film? I think the COVID 19 vaccine and lock down has addled my brain. Before we were trounced by COVID a friend had a stash of out dated slide film that he wanted to off load for a consideration. I considered, the films became mine. 

Fuji Hunt chrome 6, out of the box.

It was a mix of Fujichrome Sensia 100 35mm and MS 100/1000, some Provia 100f in120 format all from the early years of the millennium. He stated he did not know if they were any good because they had not been kept in a fridge. I told him no worries. 


I thought I would have some fun with this film because of the dubious nature of the storage. With no particular plan or theme I went a snapping before I new it I had used nearly a dozen rolls mainly 120 format. Some with my Pinhole camera but mainly the Bronica SQAi. 


Some of the film to be developed.

After a little research I found that there were a number of E6 processing kits the trouble was the one I would have liked to use was out of stock at a number of suppliers due to the lock down. I settled on the Fuji hunt Chrome 6X processing kit, I say settled did not have much choice. With hind sight this may have been a good choice. 


I received it really quickly from AG Photographic thanks guys. I opened the box to be presented with seven bottles of chemicals in different sizes and 7 pages of instructions I was not expecting that. It deflated my enthusiasm some what.


New bottles for litre dilution.


I should own up to the fact that I have never been that interested in developing my own slide film hence my comments at the beginning with the kit sitting in front of me I suppose I better get to grips with it. I read the instructions a couple of times chucked them back in the box and kicked it in to the darkroom. 


Some many month later I pulled the instruction out of the box again this time with a determination to get some film processed, about time! The first thing to note is once the bottles have been opened the first developer, reversal bath, pre bleach 2, colour developer last a max of six weeks. Which is a bit of a bummer what is also a bummer is this kit will make 5 litres of each chemical that is 35 litres in total, with a darkroom as small as mine that is a none starter I do not have the space to store it. you guessed it kicked back into the darkroom. If this carries on for to much longer maybe I should take up football instead. 

Instructions.

A few more month later I have got to grips with the instructions found a man on the bay that has supplied me with eight individual litre bottles and caps for roughly the same in pounds. I have also recalculated the chemical quantities to make a litre of each. I’m dancing in the rain now. 


Having watched E6 processing on the tube you are lead to assume that it will be straight forward the truth is that approaching this for the first time there are a whole load of pit falls that can beset this notion. Without mentioning some of these you cannot be prepared for them. For example: chemicals that started out at the right temperature are not when you come to use them, you cannot get the Dev tank lid sit properly allowing it to leak, you forget what comes next. 


What follows is the methodology and ideas to negate some of the pit falls during the procedure. 


Hot water holding tray.
You can but it is not necessary to have a water heater or some form of temperature control unit. I maintained the required levels by using boiling, hot and cold water. You will need about an hour and a half to process the film [s] if using hot/boiling water method. 


There are nine steps in the processing of slide film, two lots of temperature and two sets of agitation with total darkness and daylight sections Ooooh! my head is spinning just writing this. To keep things straight and more free flowing I produced an idiot list for reference. Numbering each step with the corresponding number on the bottle for easy recognition. 


Hot water tempering bowl with boiling water jug.

OK! let the fun begin, Just so you know I processed all the film at box speed. The first part of the development should be done in total darkness when I read this I though you must be having a giraffe can you imagine all the trouble you can get yourself into bearing in mind there are four steps to this bit alone two of which are washes. Needless to say I took a punt and did it all in daylight this turned out to be a very shroud move. 


I had three baths of water, two hot, one to initially heat all the chemicals bring them almost to temp and the other as a tempering bath where I put the developing tank, jug of hot water and the bottles of chemicals I was about to use to bring them up to using temperature if need be. Checked with a thermometer. The cold water bath was for those that exceeded the needed heat. 

Fuji Provia

The [1] first developer gurgled into the developing tank at 38 degrees I filled it until I could see the liquid in the center hole put the lid on, tapped the tank several times to remove any air bubbles, inverted it 8 times in the first 15 secs putting it back in the tempering tank then inverting twice every 30 seconds. For the 7 minute Dev time.


When the time was up I poured the Dev back in the tank. There followed two, minute washes now this is where the jug of hot water in the tempering bowl comes into play. They have the same agitation as the developer. Once you have used the water it is a good idea to refill the jug with boiling to help keep the water of the tempering bowl stable. At the same time this is happening the [2] Reversal 2 bath needs to be brought up to temperature which should be between 33 to 39 degrees. 


Pinhole double exposures Fuji Prova

The reversal bath went in for 2 mins tap the tank with one inversion at the start. Trouble struck, I could not get the lid to seal while mucking about, I forgot to put the [3] Colour developer in the tempering bath to bring it up to 38 degrees. It is important to get this spot on. There was a 2 minute delay in pouring in the developer it takes roughly 1 min per degree for the boiling water to bring a litre up to temperature.

What seemed like a weeks wait the colour developer went in for 6 mins, tap the tank several times to remove air bubbles from the film invert 7 to 8 times in the first 15 seconds and then twice every 30 secs. Placing it back in the tempering bath.


While we wait for the developer to do its trick I should mention safety. I found this processes a lot messier than black and white developing. It is a good idea to wear gloves and a plastic pinny which turned out to be a good call on my part as I spilled some of it down me. The room needs to be well ventilated although the chemicals are not that pungent they give off a lot of vapor due to the heat. 


Fuji Provia showing light damage

[4]Pre-Bleach 2 went in for 2 mins at 33-39 degrees, it was about in the middle temp wise, several tank taps, invert once and back into tempering tank.

Another glitch again I forgot to put the Bleach into the tempering tank fortunately I only needed to raise the temperature to 33 degrees plus just a short delay.


With the [5] Bleach at 35 degrees it was poured in for 7 mins tank tapped to clear bubbles, inverted 8 times in first 15 sec and the twice every 30 sec. 


This is turning into an epic, I understand why people batch develop their slide film it is a long haul to what I’m used to. I keep forgetting but you can fit two rolls of 120 film on the same reel and with a tank that can take two reels at once this is a big saving in time.


Now it is time to [6] Fix for 4 mins at 33-39 degrees, tap tank, invert 8 times in the first 15 seconds and then twice every 30 secs. This time I had remembered to put the fix in the tempering tank so when it was poured in it was about 37 degrees. A quick word about contamination it is inevitable as you go a long the process that the dregs of the previous stage will adulterate what come next it is only a problem if it go’s against the flow e.g. fix into bleach. 

Fuji Provia a frame from damaged film

Finally the Wash, it is for me as I do not use wash aid it is suggested that you wash in running water for 6 mins I chose to to use six changes of water with twenty four inversion with a minute stand between each. By using this method I saved 5 liters of water that I could reuse to flush the bog. I’m pleased that is over I felt like I have been on a marathon and I’ve only got ten more to do. It has got to be time for a cup of tea before I share the results.

Ah! just what the doc ordered. with all that has gone on with getting the film processed, you would think that the results would be a total shambles. I’m astonished at how good they are, colour saturation is spot on with no over development.


The results:


Eight rolls of slide film were developed it took over all about five hours over three days. All of them were spot on with the development. Of the three rolls of 35mm one roll had nowt on it half of it being clear the other black I think this is a camera fault and not processing as the other two roll were perfect. The rolls of 120 were all developed correctly with good colour saturation but suffered from camera problems in being over and under exposed and One of the film back had a light leak.


My initial thoughts on this process is never again it took a lot longer than I would have liked. Now that sometime has passed my thoughts have moved on to never say never. 


 For more slide pictures click this link Picture post personally processed 

All words and images in this article are the copyright of Mitch Fusco 2022


Wednesday 9 March 2022

Intermittent visit from the mottle crew bad for negatives


 Up until 2012 I had not experienced any problems with my negatives apart from the problem of water marks. The amount of times prints had been ruined because I had missed one of those dam circles. Life went on, I slowly got the hang of checking for these marks and dust.

Around about the time I started to investigate other developers. Among my group of photographer friends a number of them were talking about PMK Pyro and how it produced super fine negatives with it's staining action. I was told it came in powder form and once made up would last for almost ever.


It became my main developer producing some wonderfully smooth toned negatives and some super smooth prints I was over the moon with the results. That is until a roll of FP4+ produced this mottled affect I was stumped to the cause. The next film I developed was clear of it and so it remained for years. Over time trying a number of different developers along the way without the affect. 

Then all of a sudden three film in a row one FP4+ developed in RO9 and two rolls of Fomapan 100 one in RO9 the other Studional. So it had now't to do with the developer but something common to all three. At the time I traced it to contaminated developing tank and spirals with wetting agent and wrote an article on how I traced it. There will be a link to it at the end. 


The up shot of it was I stopped using wetting agent completely leading to negatives that dry twice as fast and with no water marks. I have been using a soft wet leather to wipe the negatives dry with no ill affects for years. The mottling disappeared as well or did it?

Until recently it is back with a vengeance it has appeared on half a dozen rolls of Fomapan 100. All processed one after the other using HC 110 the difference this time is I know it is not the developer or wetting agent contamination. I was put out only in the sense of its unpredictability I have embraced the mottle as a creative tool and like the affect it has on the photographs produced.

The one bit of information missing so far is that all the affected rolls of film have been 120 format. I went to the film cupboard there was a new unopened pack of 10 Fomapan 100. I opened it and pulled out a roll. Took it out of it's rapper ready to load in the Bronica. What is this? It has the same white silky backing paper as Ilford? Slowly the cogs clanked round.

I still had some from the pack I just processed, what's the best before date? 2018. it would seem you are more likely to get the affect the more out of date the film is. It has also become clear that it is the backing paper casing the mottle. from what I can work out it is the papers expanding and contracting at a different rate to the film base bring into sharp focus how you store the film pointing the finger at big swings in temperature say from fridge to room or freezer to room maybe adding to the increased possibility of it happening. 

On further consideration it maybe also be small amounts of moisture caught between the layers causing the large mottle I have experienced over the years along with the film being out of date. The thing that adds to this idea is the insult of the new Foma backing paper having a hole punched in it leaving a circle on the processed negative.


Once I have used up all my 120 Foma I may not replace it as I cannot trust it not to ruin a good negatives in the future. Which will be a shame as I like to use it with my pinhole camera.

I should not have to add this to the article  the copyright of Mitch Fusco 2022 all rights reserved.


Technical data:

Film I have used that's been affected Ilford FP4+, Fomapan 100, Rollei RPX 400, Agfa 400s. 

All images scanned from photographs.

 It could have been the backing paper all the time and not the wetting agent.  

   Wetting agent contamination link


Monday 20 December 2021

Preparing the Zero Pinhole Camera for use.


Using this camera is a real step back in time requiring you to put aside all those luxuries that the modern photographer has taken for granted. After all, it is just a box with a pinhole in it, the ultimate manual experience from loading the film and remembering to wind it on, to calculating the shutter speed.


Loading the film:

To start with you need to load a roll of film. That's obvious, most film cameras need film to work. If you are like me it has been a long time since you looked at the backing paper of a roll 120 film. I had forgotten that it is marked for the four different sizes in the 120 family and with the multi format camera it has three red coloured windows in which to view the film numbers. It also has a set of symbols that tell you when the number is about to appear in the window which also marks the middle of the frame. With this set up you cannot blame anyone else for winding it on to far, so it is a good idea to take it slow and gentle in the beginning. Before loading the film you need to set the format your going to use, once the back and top are in place, it is time to advance the film so the light-sensitive material is in front of the pinhole. When winding on you may notice that it becomes quite tight, this is where the celluloid attached to the backing paper is being drawn in front of the light box. Just continue gently on until the first frame number appears behind the little red window. Now the camera is primed for light capture.


Calculating exposure;

The Zero cameras aperture is set at F 235, it is important to remember this as this number is not written on the calculator attached to the back of the camera. The calculators outer ring shows shutter times from 8000 ths of a second too 15 hours, the inner ring shows F numbers from F 1.4 to F 500.


Please note that all the figures that follow are based on a film speed of 100 ISO.

Today, for example, my light meter is showing a light reading of F 5.6 @ 500 ths of a second. Now using the calculator move the dials so F5.6 is opposite 500 ths of a sec., then find F 235 on the outer ring and read off the time opposite which is about 3 second; you will need to make an adjustment for reciprocity effect by a factor of 2 making an exposure time of 6 seconds. I say 'about' because the next F number is 250 with an indicated shutter time of 4 seconds. To start with it is a bit hit and miss, that is why it is a good idea to make notes on shutter times so you can see where to make adjustments once the film has been developed.

You will need to make adjustments for the reciprocity effect as follows:

  • From 1 second and over compensate by multiplying by 2 giving an exposure of 2 seconds.
  • From 5 seconds and over compensate by multiplying by 5 giving an exposure of 25 seconds
  • From 50 seconds and over compensate by multiplying by 12 giving an exposure of 600 seconds/11 mins.


Sunday 19 December 2021

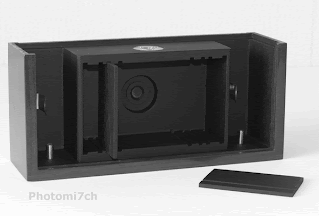
Zero pinhole camera


Pinhole cameras have been with us for a long time in all sorts of shapes and sizes. Aristotle wrote about this naturally occurring in the fourth century. It was not until the 1850 s when the Scottish scientist Sir David Brewster used a pinhole camera to produce the first photograph. It has taken on many forms ever since!

Over recent years the pinhole camera has come to the fore as a desired method of producing a different style of photograph. This popularity has been helped by the zero image company, making some wonderfully crafted boxes for the pinhole photographer. They are not just great looking collectibles but are fully working cameras that take some excellent photographs. They come in the three main formats of 35 millimetres, 120 medium format and 5 x 4 large format.

This camera has not been an easy acquisition for me, with several false starts I have had to compromise to get a deluxe model but it is in my format of choice if not the camera I really wanted for the project. Having said that I am not disappointed with the multi format camera. On hindsight this could be a good thing, as it allows me to play with the different sizes that make up the 120 family at a later date.

So whats in the box apart from a well crafted wooden camera that some quarters think would make a good jewelry box. Thinking about it, I can see what they mean with the multi format version!

  • A plastic view finder marked out in the different 120 formats.
  • A very nicely presented instruction manual that needs to be read if you are serious about getting the most from your camera.
  • A grey cord? Not sure why this in the box.
  • A certificate telling you who hand crafted your camera.

There are some other bits of kit you need to gather before you stroll down the road with your camera.

  • You will not get far without a spare spool to wind the film on to.
  • A light meter unless you are going to use sun rule 16.
  • A cable release is a good idea if you have the deluxe version as it removes any chance of camera shake.
  • Tripod.
  • A note-book and pencil is a good idea for recording frame numbers and exposure times. That then can be checked against the negatives once they have been developed. Giving you an indication as to whether you are over or under exposing.

Sunday 5 September 2021

Bronica battery trouble.

I really enjoy using my SQAi But recently its reliability has become unpredictable to the extent that I have seriously thought about getting rid of it.


I know what the problem is, it is to do with the silver oxide batteries and the way they make contact or not with the contacts in the camera. On occasions a film has built up insulating the batteries from the camera contacts. A quick scrape and all is well again. Recently this has gotten out of hand in such away that I'm no longer sure if the shutter will fire from one frame to the next even after checking that the contacts are clean.

I've concluded it is one of three things: the batteries are not up to the job, bad manufacture, or that something in the camera has worked loose? Or maybe all three. I am so fed up with it so much so that I have dug out my motor drive for the Bronica - something I have not used in years. I have also bunged on the eye level prism, which corrects the backward view you get from the flip up viewfinder. I did this because it makes the use of the camera more seamless.

A drastic move I know as Bronica did not produce an auxiliary battery pack for its cameras like others have. It adds weight that I'm not happy about but if it makes the camera more reliable then all to the good.


I can not believe how much these changes have reinvigorated my image making. It is akin to when I first purchased the camera. It works every time freeing me up from that nagging 'will it?' or 'wont it?'. It was satisfying to hear the clump of the shutter with the outlandish sound of the motor as it wound on. No more senior moments. With the addition of all this technical wizardry it has made it more enjoyable. If I had known this, I would have made the changes ages ago.

Has anyone else experienced this problem with their Bronica, if so how did you cure it?  

update 12/2018

I thought I would update this post by saying that the motordrive I fitted a couple of years ago has dealt with the battery problem. It does this by taking on all the power requirements of the camera. 


Update 5/9/21

Further to the battery problem noted above I have now put a bit of card in the battery box to force a better connection. It has work well but the build up on the contacts needs an eye kept on it. As it can go back to it's old ways. It is also a good idea to sand the negative side of the battery it gives a better contact.

If you use the motor drive without the silver oxide batteries fitted the light meter view finder will not work as it takes its power from them only.


Tuesday 16 February 2021

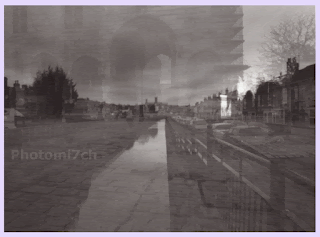
Zero double take project first results.


Zero 6x9 pinhole camera.


As I sit here reviewing the first batch of photographs from double take, the wind and the rain is still lashing the property - something it has been doing for the last twenty four hours. I'm pleased to be inside in front of a warm fire with Tabatino who is stretched out in front of it like a rug. 


Zero 6x9 pinhole camera.


The contact print shows that the second exposures are quite weak and will require dodging and burning to make their presence felt. With this in mind I  have been using half page test strips  so I can see how much more exposure is needed to bring out the weaker parts of the negative. This has given me a better overall idea of how much extra time the weaker parts of the picture need so I can get as close as possible to what the final print will look like. Having  chosen to use 6x6 negatives I find myself cropping them to a landscape frame size giving me more choice over which parts of the negative make the final composition and partly to get the best use out of the paper size. I'm using Silverprint's gloss proof paper mainly because I believe it has added something to the overall expression of the photographs.


Zero 6 x 9 pinhole camera.


The results of this first film have been a pleasant surprise in that most of the negatives have produced picture combinations that work well. Whether this is down to luck or the pre-planning in the picture combinations only time will tell. The day I took the pictures was a challenge in that it was windy with a broken cloud sky that was fast moving making metering each shot difficult. By the time I had worked out the shutter speed and opened it the scene in some cases had gone from bright sunshine to dull and overcast or vice versa. It just goes to show how forgiving film is when it comes to exposing it in rapidly changing light conditions over extended periods. These were printed at grade 3 and not my more common split procedure.


Technical data: 

Film 120 FP4+ set to 6 x 6 negative size, developed in PMK Pyro, Printed on silverproof paper, developed in Ilford warmtone developer.