Pages

Showing posts with label bronica. Show all posts

Sunday 25 January 2015

Light metering?

For years I wanted to obtain a Bronica and when I did it was a very happy day. The SQAi has done a lot of travelling over the years; in all sorts of weather and across many different terrains. It has let me down on a couple of occasions but I do not blame the camera, overall it has been a great bit of kit. It can be a pain literally on long treks as it is no light weight, even in its lightest configuration.

I have not always been happy with the camera. When I first had it I could not get used to the back to front image which was really frustrating at times. I was not happy with having to use a hand held light meter either. I know! why did I
purchase it in the first place? Boyhood dream of some day of owning one? It has taken sometime for its use to become second nature, but now that it has, my picture making has become more fluent.

Along the way, my light meter use has changed; with some experimenting, I have found that two readings is better than one over all, making white bland skies with monochrome film a thing of the past. I, like you, have tried to solve it by using black and white filters from yellow to red and graduated neutral density filters to name a few. All of which are now gathering dust some where. Really and truly all you need to do is take a second light reading. Of what? The brightest part of the scene which in most cases is the sky and the amount of time it takes to do this makes it a no brainer. In fact you could have taken several in the time it takes to read this.


An understanding of Ansel Adams zone system helps to produce better negatives.

The picture right give a rough idea on how it works.

I have metered skies that have been as much as six stops brighter. In these cases, would it mean shutting the lens down by three stops to allow for it? With a little bit of help from the zone system you may only need to allow one stop to improve the detail in the sky, this would lead to better detailed negatives. The extra information would lead to more easily produced photographs.

Yes you can bracket your exposures which is a good way of learning what works best for you but as a long term method it is a waste of film. The idea is to know what works so you can get it right first time.


On average I have found that the skies in my pictures are about two to three F numbers brighter, meaning a slight adjustment to the exposure before pressing the shutter will produce more detail in the sky on the processed negative, without making the main part of the image too dark. When it comes to printing, whether burning in or holding back, depends on which method you prefer to use in the darkroom. My working method leads me to add light (burn in) more often than take it away (hold back). The sky is not always the brightest part of the picture, I'm using it in this case because it is the most common complaint with developed negatives and to keep my explanation simple.

The following pictures show what happen when the sky is taken into account:


120 format Film FP4+, 6x6 negative,
 Developed in ID11 ,
Printed on Ilford multigrade RC gloss,
 Developed in Ilford multigrade.


This picture was metered for the piper. I did not take a second reading for the sky. I have been unable to burn the sky in hence the white out so to speak.


120 format film FP4+, 125 ISO, 6x6 negative
Developed in Ilford multigrade developer
printed on multigrade RC gloss.


With this picture I closed the aperture down by one F number to allow for the sky. For example from F.8 to F.11. As you can see the clouds have been picked out. With a bit of burning in (adding light) The sky would have more contrast therefore stand out.


120 format Fomapan 100 ISO, 6x6 negative,
Developed in RO9, Printed on Ilford multigrade RC
gloss, Developed in Moersch 6 Blue.


This is a badly scanned photograph but it does illustrate how well the clouds stand out.

It was a difficult scene to meter. The lighting was changing quickly. The light reading for the sky was indicating a difference of three F numbers in brightness more than the overall reading.  In the end I only shut the lens down by one F number. It is a straight print without any burning in.


Tuesday 9 September 2014

Loading a Bronica film back

college still life
On one particular trip I made into college I was met by my tutor who placed in my hand a Bronica 6x45 camera and a roll of film in the other. Then told me to go into the studio and make pictures of the still life he had set up. Wow! I had wanted to try out one of these cameras for ages, part of this enthusiasm was when I found out that the lenses were made by Nikon. Sadly later models used seiko lenses. This is not to say the quality is any less. At one time I was very keen on all things Nikon.


I placed the camera on the tripod and released the film door to load the film. Which stopped me in my tracks. “How the hell do you make this work” I was expecting it to load the same way as other 120 format cameras that I had used. A short time later the tutor came in to see how thing were going. As he approached he smiled and said “It does not matter how many students I give this camera to you are all stumped by the film loading”. He took the film back and reversed the backing paper over the pressure plate round and onto the other reel. It was that simple.

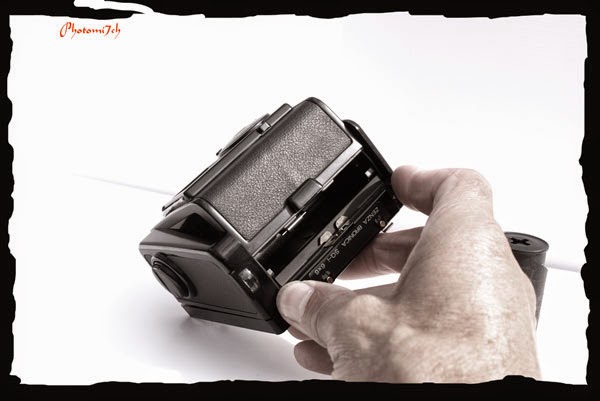
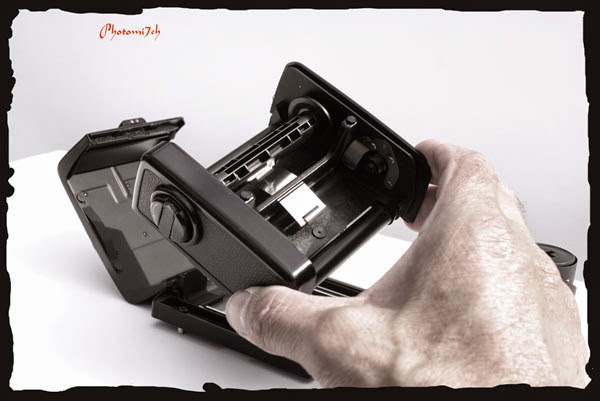
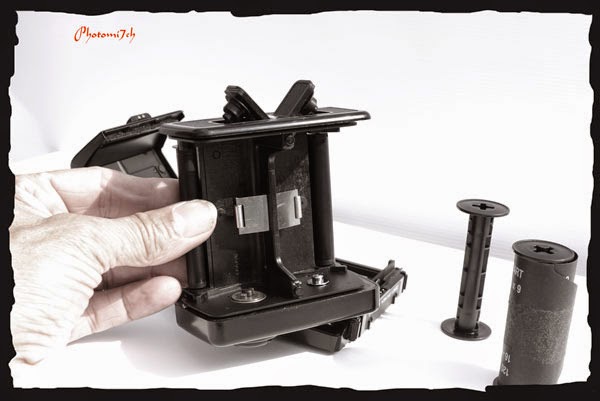
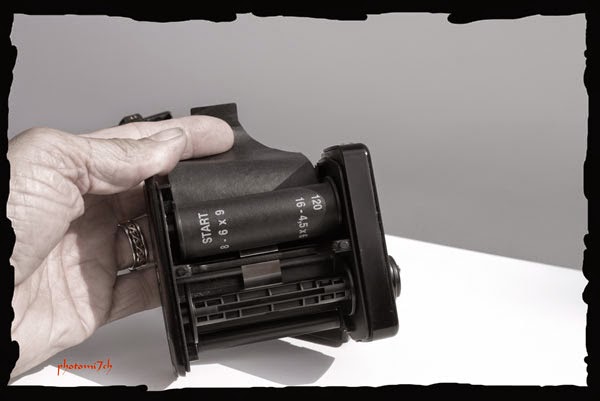
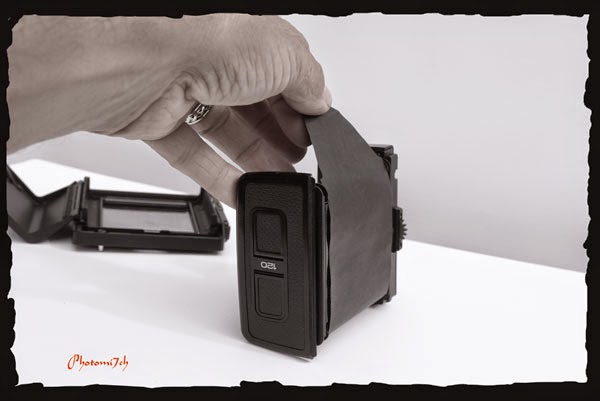
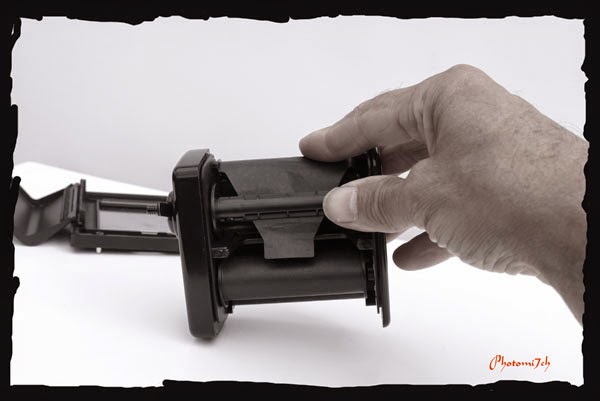
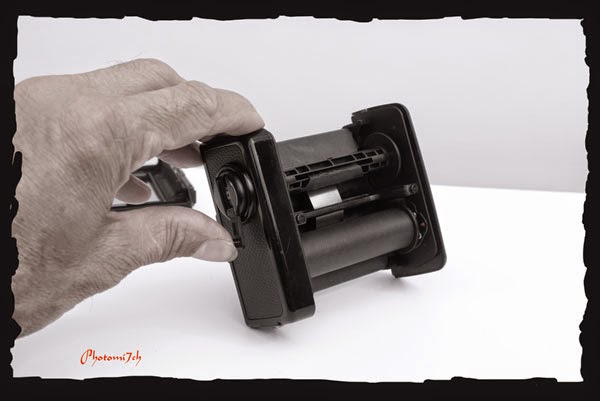
For those who are not familiar with the way you load film into the Bronica here are a few pictures to point the way.

Film backs can be loaded on or off the camera body.

To open the film back compress the two clips on the top. The door will spring open

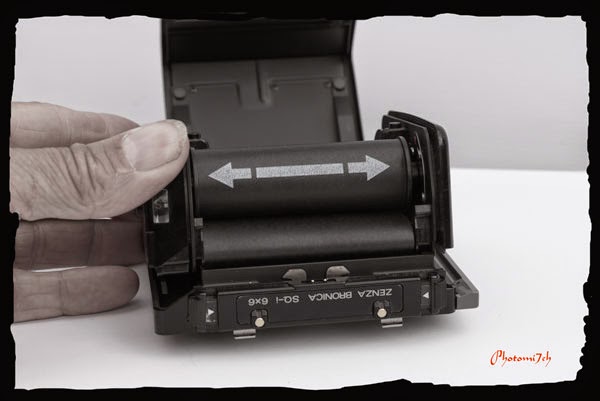
Remove the film holder from the case.

Push open the film spool holders.

Place the empty spool in the lower holder this is the one with the winder on the side. With the fresh film in the top as shown pull the paper backing over the top.

Pull the paper backing all the way up and over the top

Thread the paper backing into the empty spool as shown

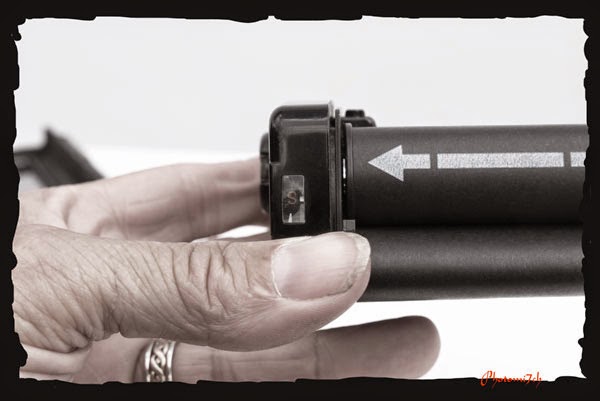
Using the winder on the side of the film holder wind the paper on

Keep winding the paper backing until the arrow shows and stop 

Place the film holder back in its casing and close.

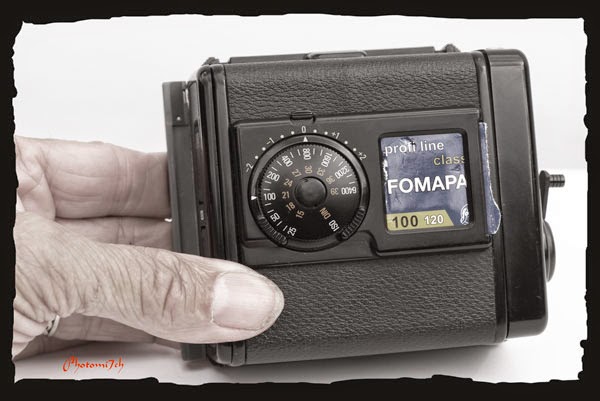
Do not forget to set the ISO. If you use a number of different film tear off the top of the film box and slide it in to the window.

Monday 26 May 2014

Four Film

The Plan.


This is the first time I have four different manufactures of black and white film in 120 format in stock. To mark the occasion I'm going to compare them to see if there is a noticeable difference between them. This comparison is not about which is the best film to use but to do with creativity and what each emulsion may bring to the party. Choosing a film in the first place is very subjective, you can ask as many questions as you like and look at loads of pictures that are the product of it's exposure but you will not truly know how it looks until you use it for yourself. FP4 was the first roll of film I chose to use and has remained my favorite ever since. At the time it was a close run thing with Kodak's offerings.


The protagonists are, of course Ilfords FP4+, Fomapan classic 100, Adox CHS 100 and Rollei retro 400s.


FP4+ has been the main stay of my median format work and therefore I know how to get the best out of it. The Rollei 400s and Fomapan classic are the two out of the four that are unknown quantities when it come to exposure and development. So to a certain extent the results will also have a first impressions flavour. Not always the best way to judge a product. I have used the Adox before in 35 mm format so I have an idea what to expect and in that case was not favourable but I will not let that taint the use of its bigger brother. I am also aware when loading Adox film it needs subdued lighting as it fogs easily in bright conditions. The Fomapan classic when processed with certain combinations of fix and developer can be susceptible to pinholes appearing in the emulsion but then I have had this with FP4+ in the past.


All the pictures will be made on a Bronica SQAi. I will not be replicating the same twelve views across all the films. I prefer to make pictures when the opportunity arises. They will all be exposed at box speed and developed in ID11 and processed as normal, then printed on an RC paper that will be chosen at the time of printing. I decided to keep things simple and use materials that I have a good understanding of, making it easier to tell how well the two unknown films have been exposed and developed.

All we need now are the exposed and developed film. The links below will take you to the follow up posts.


The links below are the follow ups to this post.
The developed film

The prints


Tuesday 6 December 2011

The story behind the Winter Picnic Photograph.


It was round about this time last year (November/December 2010) that the UK was in the grip of the worst cold spell for as it turns out a hundred years. The country may have just missed coming to a standstill but it stopped me in my tracks literally, as I couldn't get the truck off the drive. The ice was a solid two inches thick not allowing for any grip!

The snow brought a brand new look to the area that I had not seen before, so I thought I would go out and take some photographs of this fresh, clean new wonderland of soft edges. Armed with my Bronica SQAi 120 format camera loaded with FP4 film I trudged gingerly off into the countryside.

Picnic
I was quite surprised to find there we a lot of people out and about with the same idea, walking the dog, playing and enjoying their enforced day off work. As I strolled further afield the numbers thinned until I was alone enjoying the crisp white land the snow had laid out for me to photograph; so engrossed with the scenes before me I forgot how bitterly cold it was until my throbbing freezing fingers sent SOS messages to my brain and brought me back to reality -“Shhahhhoi!!! Its cold.!” Pulling my gloves on the best I could I made off in a hurry to warm up.

Briskly walking up a path by one of the lakes the path turns a corner at the top where there is a bench and from a distance it looks like someone is sitting there! As I got closer I could see it was two people! -”they must be mad!- and it looks like they are having a picnic!” As I got closer I could see steam from their cups as they ate their mince pies! An idea for this picture was forming as I approach them to ask if they would mind being in the photograph. They did not mind, so I walked back down the track a bit, set up the camera on the mono pod, took a light reading and pressed the shutter. You're right! I only used one frame, no back up or bracketing, the view that came to mind is the one I took. After the shot was taken I walked back and chatted for a while. Apparently they don't let a little bad weather get in the way of them coming to their favourite spot! I wish them the best of the season and moved on. Not so mad after all! I wish I had thought to bring a hot drink with me!

I am pleased to say that Picnic was one of the Pictures chosen for this years Film and darkroom users Year Book. Which can be obtained from Blurb.

FADU year books