Pages

Showing posts with label ansel adams. Show all posts

Wednesday 23 March 2022

Ansel Adams collection of Portfolios


On one of the many trips in to London many years ago I found myself strolling down Tottenham court road which meant that a detour into Foils Books Store was on the cards before travelling on. It was a warren of floors dedicated to the written word. A discombobulation of a place for those that did not know where their category of interest was held. Fortunately for me this was the umpteenth visit and I knew which floor I needed. Needless to say that getting there was an endeavour in it's self.

Onward and upward to the art/photography department on arrival I stopped momentarily to catch my breath, take in the smell of new books and wonder at the sight. Shelf upon shelf almost to the ceiling of publications standing like solders side by side. Titles like faces undulating along the shelf's as you pass. 

I had just dropped in for a look, I had no particular book in mind it was a destination in its own way, away from the frantic streets outside. A moment to feed the mind. As I looked through the sections I came across The Portfolios of Ansel Adams. “That interesting I thought” and flicked through the pages looked at the price put it back on the shelf and moved on looking at and replacing a number of books. It is interesting to note that all the time I was looking at other volumes my mind kept coming back to the Ansel Adams book it had left an impression.

A short time later I was back in the mix of hurrying people in the street with a bag containing the Adams book. I cannot remember why I was in London, where I went next or if I had my camera with me. The only thing I can be sure of is that a tube ride would have been part of my getting home. With a chance to get a proper good look at my purchase. 

Recently the book is off the shelf and on the coffee table waiting for me to re-antiquate myself with Mr Adams images. I don't know what others do but I like to kick back on the couch with a cup of coffee or tea and spend time with each image studying it in detail. In this case putting the book down at the end of each portfolio to come back to another day.

According to the write up in the book these reproduction are as close as you can get to the original photographs. This I can vouch for having compared images with the same pictures that appear in Ansel Adams 400 photographs book.

Looking back I was fortunate to happen upon the collected portfolios book as I do not think I will see an original and or one of his prints in the flesh. But never say never.


This article is the copyright of Mitch Fusco 2022 all rights reserved.


Monday 15 February 2021

Reciprocity How it may affect monochrome film


The use of a Zero pinhole camera means that long exposures are the norm.
It might be a good idea to give an insight into how reciprocity affects the negatives. It is a wide-ranging subject that afflicts colour and black and white materials in different ways at long exposures, extremely short exposures and with flash. Because of this I am limiting this post to long exposure times with black and white film.

The Law:

The formula E=IxT expresses reciprocal relationship between the intensity of light reaching the film and the time allowed to act on the film. If one increases the other decreases proportionally, no net change in exposure occurs.

Ansel Adams The Negative.

At long exposures this law breaks down, known as reciprocity failure. It is where a seconds worth of light is not enough to satisfactorily produce the required densities in the negative. So the longer the exposure the greater the compensation needs to be. With these exaggerated times comes a side effect in that the lower values recorded become under exposed more than the higher ones causing the contrast of the negative to increase. You can make adjustment for this when developing the film by a reduction of ten percent for up to ten seconds, from ten seconds by twenty percent and from a hundred seconds by thirty percent. These changes are easy to control for single frame exposure made with large format cameras but a little difficult to achieve with roll film. If all the frames on the film are exposed for no longer than ten seconds then the ten percent reduction will control the increase in contrast across the whole film, but in practice this is not always the case with exposure times being all over the place. I would suggest that a reduction of ten percent be the starting point and that with experimentation will find what works best for you. Having said all this the side effect of higher contrast maybe to your liking in which case where's the problem.


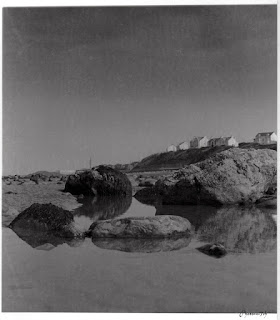
The picture included in this post shows a slight increase in contrast. The negatives Ilford FP4+ were processed in PMK Pyro without an adjustment for increased contrast. Printed on grade two multi grade paper developed using Moersch 6 blue.


The following images and those above were all made using a Zero multi format Pinhole camera. The pictures below are from negatives using Fomapan 100 at box speed developed in studional for 11 minutes. scanned from photographs printed on Ilford multigrade 4 developed in souped ilford multigrade. 


Friday 24 August 2018

Zone System really


Love it or hate it Ansel Adams zone system has become the cornerstone of film exposure and printing that a lot of people cannot get their head round. I was one of those people until I made a point of sitting down many years back with a copy of what he actually wrote.

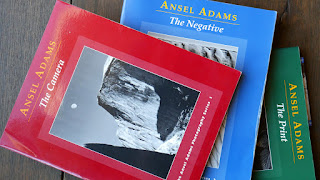
 It is important to stress that when reading his method on the zone system that it comes from the source and that now a days is his volume on the Negative. This is the best place to start your understanding of the process. How do I know this? I read an abridged version of The Camera, The Negative and The Print. To my amazement some of the important parts of the method were left out which made it impossible to understand.


 It was a friends encouragement that I obtain all three volumes and if I did It would improve my understanding of the relationship between the camera and the final print. He was not wrong. I ended up reading all three from cover to cover. I must admit reading the bit on the zone system left me cold. I was none the wiser from this first read. I speculated that I was producing nicely exposed negatives so what was the point.
A year or so later I started to see a number of references to the Zone system on the internet. Some condoning it and other condemning it. This reignited my curiosity in trying to understand it; so I made a loose leaf copy that I carried around with me so I could read it whenever I got the chance and make notes.
I cannot remember how many times I re read it or how many notes I made to remind me what I did not understand and how that fitted in with the rest but all of a sudden it made sense. I could work out how it related to what the light meter was telling me.


It made a difference to the way I metered and exposed the film it also settled down my sometimes erratic results. I noticed that the negatives started to be more consistent in there density which transferred to the darkroom. The number of segmented test prints reduced across a series of images on the same film.

It has been more than a decade since I set out to understand the Zone system. It will always be there in the background of my mind jumping to the fore when I have a particularly difficultly scene to meter. In the main, I use a sort of high bred method that gives me the style of negatives I'm looking for.
All I'm saying is a better understanding of where different tones and textures appear on the tonal scale in relation to the exposure data can only lead to better more consistent results.


Sunday 26 August 2012

The perfect print; possible?


It is still one of the most talked about subjects Visit any forum to do with photography digital or traditional and you will find threads relating to the perfect negative or capture. What developer to use, how to manipulate the raw file, what does a well exposed negative or histogram look like and so on. But this post is not about our digital friend or for that matter the negative it is to do with the photograph - the positive end of the process. I cannot get there without some negative chat first though!

After the recent deluge it is nice to be sitting back in the garden office writing this post and enjoying the late afternoon sun with my friend the cat. It is quite surprising how peaceful it can be in such a built up area. Not as negative as you thought but I digress.
It was Ansel Adams and Fred R. Archer that gave us a proven method of producing a properly exposed negative every time with the zone system. They divided the black and white negative up into eleven sections if you include zero from pure white to full black. Adams then said that really there are only nine zones if you are in pursuit of the perfect negative and then only seven of those will give texture. This is all well and good if you are using a plate camera but most of us don't. We use cassette and or roll film where all our carefully exposed negatives get a one time fits all development. In a round about way Mr Adams is saying that film sees the world in a more limited way to us. So we have all engineered ways of finding our perfect negative. What do I look for? A negative that has detail from high light to shadow and a good density above base clear in other words defined rectangles of tones the length of the film.


The day was very bright that the light
meter read a six stop difference
between the house wall in the background
and the shadow cast by the barn. I
over exposed the negative by two and a
half stops.
We all strive to produce the perfect negative but it was not until recently that it dawned on me that it does not necessarily translate to the perfect print. So what is the perfect print? One that is easy to print but what do they mean by easy to print? One that does not require a lot of dodging and burning. A single exposure success wouldn't that be the perfect print! With the way the negative sees the scene in front of it and all the variables in its path is it not inevitable that you will have to manipulate the image projected onto the base board of the enlarger to produce the perfect print? 
 

Recently I came close to my interpretation of the perfect print, one that does not require a lot of manipulation. By placing the test strip in such a way that the area that needed burning in was exposed to several different timed exposure segments this allowed me to add the extra time for that area to the first print. With experience the hit or miss aspect of the test strip process is lessened. It still doesn't take away that bit of a buzz when it all falls into place. Something I've never had with digital.

Friday 23 December 2011

Filing systerm.


This is down to personal choice as to what record keeping you attach to your processed films. You can write it in a notebook, a file on your computer or as I do along the top of the film sheet. What data should you record:
1. Date it was developed.

2. Make and type of film.

3. Reference number of the film for your files. I use format size and date of development as a reference number.

4. Developer used.

5. Dilution.

6. Development time.

7. Results.
The more comprehensive your records are the more you will use it, to refine the processing of your film. Ansel Adams believed in keeping meticulous records, this maybe part of the reason his pictures are so well printed.